
Version 3.0 - Legacy
Last: Vers. 5.9 - 2022
- Developers' Guide
- Introduction
- Administrator's Guide
- Connecting to Everyware Cloud
- REST APIs
- Supplementary Documentation


PART 4. USING EVERYWARE CLOUD WITH REST APIs
Using REST APIs
· Overview
Invoking REST APIs in Linux with 'curl'
Use REST API to Display Data – XML Format
· Display List of Metrics by Topic
· View User and Account Settings
Use REST API to Display Data – JSON Format
Using REST as URL
Overview
This section describes how to use URLs in a Web browser to query for data in the Everyware™ Cloud data store, applying REST APIs. In order to use these instructions, you will need to have an MQTT client connected to the broker, such as the stand-alone MQTT client described in this developer’s guide.
This document provides only a sampling of REST APIs in use on the Eurotech Everyware Cloud. For more complete reference information on each of the supported APIs and their options, see the following API documentation: https://api-sandbox.everyware-cloud.com/docs/index.html.
In this section, you will learn how to:
- Use a Web browser to invoke REST APIs, showing data in XML format
- Show a list of devices, assets, topics, messages, metrics, rules, and users in the Everyware Cloud account
- Use REST APIs to filter only certain sets of data
- Use REST API to retrieve data in JSON format
- Use the ‘curl’ command in Linux to invoke REST APIs
This how-to guide assumes you are using Eurotech’s “Sandbox” broker, which is used for customers with development systems and uses Web URLs starting with “https://api-sandbox.everyware-cloud.com/v2/”. If you are using the Production broker, you will have a different URL that should be substituted in place of the URLs described in this document.
URL Encoding
Several examples in this section show encoded URL addresses. URL-encoding is necessary when the URL string includes characters that are reserved by the URL syntax or are outside the ASCII character set. In these cases, URL-encoding replaces the offending characters with a percent sign (%) followed by the two hexadecimal digits identifying the original character.
For instance, the URL-encoded representation of the URL
is the following:
See http://www.w3schools.com/tags/ref_urlencode.asp for more information on URL-encoding. There are also a number of free online utilities to encode/decode URL links (such as here or here).
Among others, the address must use URL-encoding for the following symbols:
/ %2F
+ %2B
# %23
% %25
NOTE: After the URL of the API query is case-sensitive. So for instance, make sure “searchByTopic” contains an uppercase “B” and “T”, ensure that you use the proper case for the topic strings, and so on.
Invoking REST APIs in Linux with 'curl'
This document describes the use of Everyware Cloud REST APIs to read resources. In the next section Use REST API to Display Data in a Web Browser, we provide examples of Everyware Cloud RESTful requests entered as URLs in a Web browser. If you are using Linux and want to try the Everyware Cloud REST APIs from a command line, you can use the ‘curl’ command to issue the HTTP commands.
Below are some examples of using ‘curl’. The Linux machine must have Internet access and the ability to resolve the DNS name of the URL. These examples focus on reading REST resources that, in RESTful terms, result into HTTP GET requests.
To see a list of devices, use the command:
curl --user myEdcUserName -k https://api-sandbox.everyware-cloud.com/v2/devices.xml
or
curl --user myEdcUserName -k https://api-sandbox.everyware-cloud.com/v2/devices.json
where:
myEdcUserName is the name of a user for your account who has been granted the “data:view” permission.
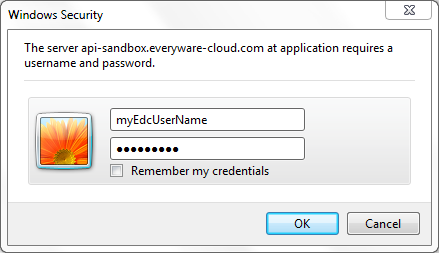
After issuing the command, you will be prompted for a password. Enter the password associated with the myEdcUserName user.
The following commands are examples using optional query parameters with the password included on the command line:
curl --user myEdcUserName:escapedPassword -k https://api-sandbox.everyware-cloud.com/v2/devices.xml?limit=10&offset=10
or
curl --user 'myEdcUserName:Password' -k https://api-sandbox.everyware-cloud.com/v2/devices.xml?limit=10&offset=10
where:
escapedPassword is the password associated with the myEdcUserName, but using the backslash escape \ character before symbols to make them literal. When using the second form (single quotes ' around myEdcUserName:Password), the escape character cannot be used and the Password cannot include a single quote.
See the following sections for additional examples of REST APIs using a Web browser. The same examples can be run using the ‘curl’ command in a very similar way.
Use REST API to Display Data in a Web Browser
Enter the following URL into your Web browser to see a list of devices:
https://api-sandbox.everyware-cloud.com/v2/devices.xml
You will first be prompted to log in using your Everyware Cloud user account. You should use the Administrator user or another user that has the correct permissions to perform your operation. In the previous example, the “device:view” permission is required to view a list of devices.
In the Web browser, you may receive a prompt warning about the display of secure content as shown in the following screen capture. If this happens, enable mixed content (HTTP/HTTPS) to eliminate the warning messages. To enable mixed content in Internet Explorer, select Tools | Internet options, click on the Security tab, and then select Custom level. Under the Miscellaneous section, change the option “Display mixed content” to “Enabled” and then click OK to save changes.
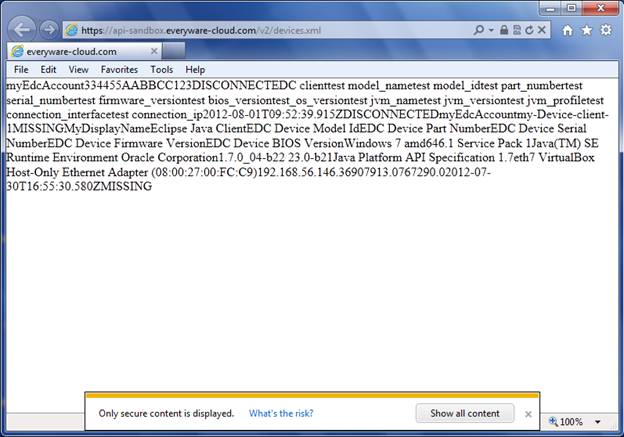
Refresh the browser window to view the XML results without an additional prompt as shown in the following screen capture.

Display List of Devices
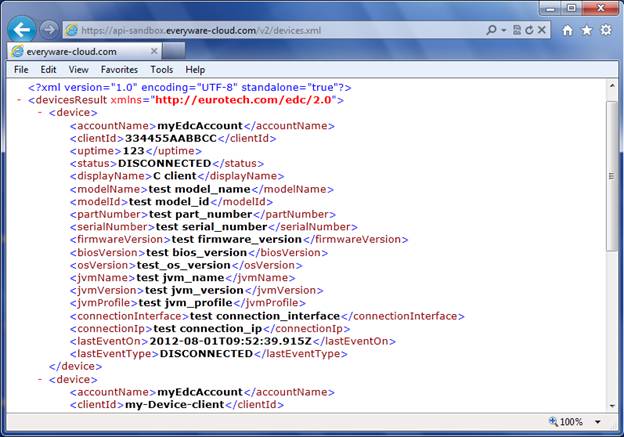
The Devices API displays a list of devices on your Everyware Cloud account. Enter the following URL into your Web browser:
https://api-sandbox.everyware-cloud.com/v2/devices.xml
The following screen capture shows the devices that have connected to your account.
Refer to the “Devices” section of the REST APIs referenced in the Overview of this document for more options on the various REST parameters available.
For instance, let’s say you had 50 devices connected to your Everyware Cloud account. In order to read information about the first 10 devices, use the following URL with the path parameter “limit=10” at the end:
https://api-sandbox.everyware-cloud.com/v2/devices.xml?limit=10
To read the next 10 devices, use the “offset” parameter of the “devices” resource:
https://api-sandbox.everyware-cloud.com/v2/devices.xml?limit=10&offset=10
Note that the first parameter after the “.xml” URL is separated with a question mark (?). Each subsequent parameter must be separated using an ampersand (&) character. The order of the parameters after the question mark does not matter.
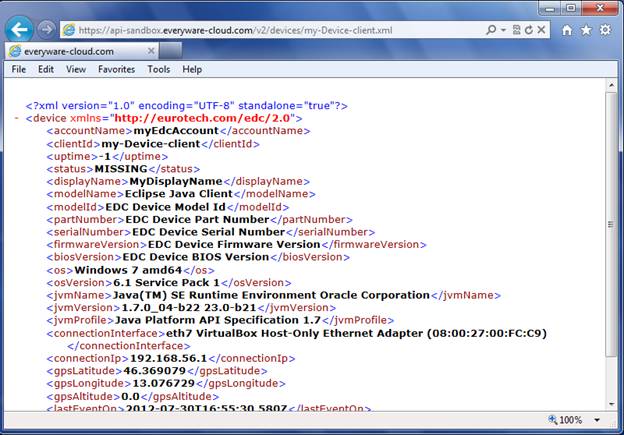
Once you have used the “devices” resource to get a list of devices or if the client ID is already known, you can use the “devices/{clientID}” REST resource to query just a single device. Substitute the actual client ID for “{clientID}”.
https://api-sandbox.everyware-cloud.com/v2/devices/{clientID}.xml
The following screen capture shows the MQTT Java client device with client ID “my-Device-client”.
Notice that in the API documentation (https://api-sandbox.everyware-cloud.com/docs/resource_Devices.html), “{clientID}” is a path parameter, rather than a query parameter as in the previous examples.
Notice also that the “.xml” suffix is always attached to the end of the URL path, but before any query parameters.
Display List of Assets
The Assets API returns a list of assets on your Everyware Cloud account. Enter the following URL into your Web browser:
https://api-sandbox.everyware-cloud.com/v2/assets.xml
The following screen capture shows the list of assets. While most often, each asset is mapped to a single device, a device can publish as multiple assets. In other words, a device can have multiple applications running on it each publishing as a different asset ID. The example below shows four Assets including the MQTT Java client asset with asset ID “MyEclipseClient”.

Refer to the “Assets” section of the REST APIs referenced in the Overview of this document for more options on the REST parameters available. The following are a few examples:
Display a list of messages published by a specific {asset}, where the asset ID is part of the URL:
https://api-sandbox.everyware-cloud.com/v2/assets/{asset}/count.xml
Display a list of topics for a specific {asset}, where the asset ID is part of the URL:
https://api-sandbox.everyware-cloud.com/v2/assets/{asset}/topics.xml
Display List of Topics
The Topics API returns a list of topics on your Everyware Cloud account. Enter the following URL into your Web browser, and the list of topics will be displayed.
https://api-sandbox.everyware-cloud.com/v2/topics.xml
Refer to the “Topics” section of the REST APIs referenced in the Overview of this document for more options on the REST parameters available. The following are a few examples (where in place of “{account}” you should use the actual account, which is typically the root level of the published topic strings):
https://api-sandbox.everyware-cloud.com/v2/topics.xml?prefix={account}%2F%2B%2Fsample
The following screen capture shows the list of topics.
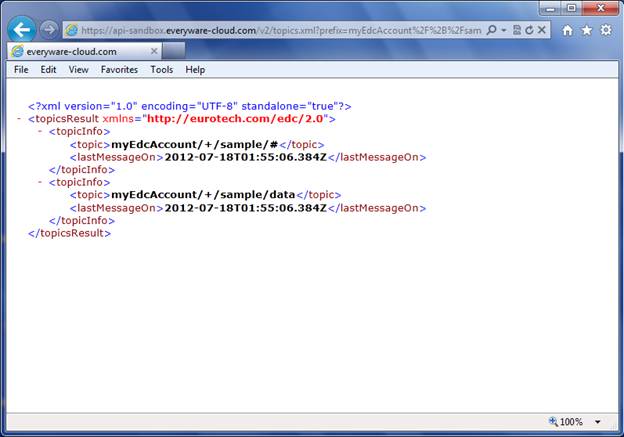
Note that in this example, the “prefix=myEdcAccount%2F%2B%2Fsample” is equivalent to “prefix=myEdcAccount/+/sample”. However, the address must be URL-encoded in order to work correctly in the browser. See the section URL Encoding for more discussion on URL-encoding.
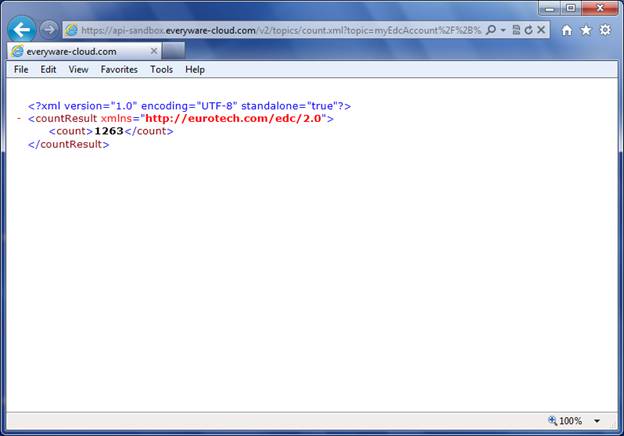
The following example displays a count of all messages published under a given topic (use actual topic string in place of {topic}, URL encoded). In this example, the topic “myEdcAccount%2F%2B%2F%23” is equivalent to “myEdcAccount/+/#”:
https://api-sandbox.everyware-cloud.com/v2/topics/count.xml?topic={topic}
Display List of Metrics by Topic
The Metrics API returns a list of metrics that have been published under a topic. Enter the following URL into your Web browser, where “{topic}” should be replaced by an actual topic of interest, URL-encoded. See section URL Encoding for more discussion on URL-encoding.
https://api-sandbox.everyware-cloud.com/v2/metrics/searchByTopic.xml?topic={topic}
The following example shows several metrics that have been published to the broker on this account, with their data types.

Display List of Messages
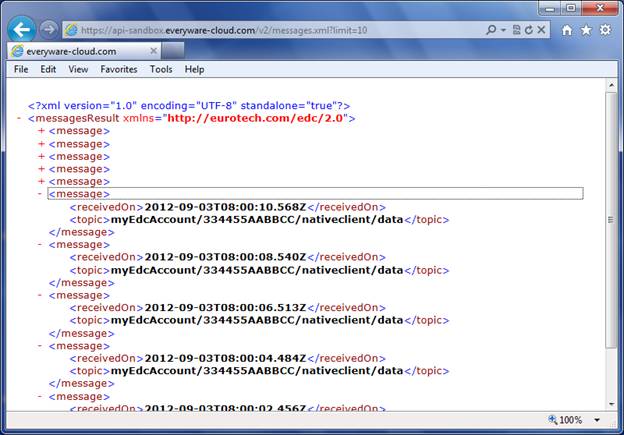
The Messages API returns a list of messages on your Everyware Cloud account. Enter the following URL into your Web browser, and the list of the first 10 messages will be displayed.
https://api-sandbox.everyware-cloud.com/v2/messages.xml?limit=10
The following screen capture shows the list of messages displayed. In the browser, you can show or hide portions of the XML data structure by clicking on the + and - symbols. You can also add the “&offset=” query parameter to start the list at any point in the messages database.
Refer to the “Messages” section of the REST APIs referenced in the Overview of this document for more options on the REST parameters available. The following are a few more examples.
Display a count of messages in the account:
https://api-sandbox.everyware-cloud.com/v2/messages/count.xml
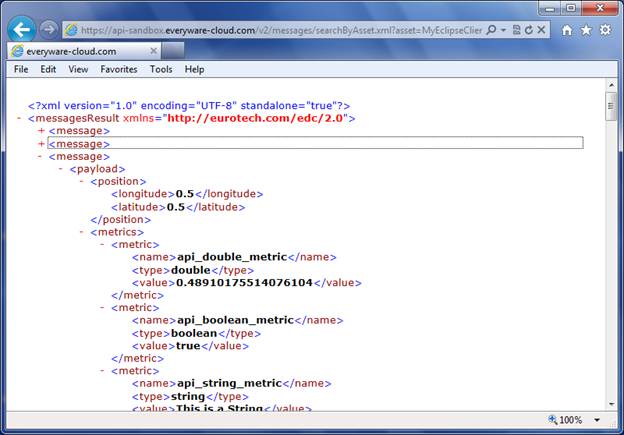
Search messages by asset ID (use actual asset ID for {asset}):
https://api-sandbox.everyware-cloud.com/v2/messages/searchByAsset.xml?asset={asset}&limit=10
The following screen capture shows the MQTT Java client asset with asset ID “MyEclipseClient”.
Search messages by topic (remember the topic is case-sensitive):
https://api-sandbox.everyware-cloud.com/v2/messages/searchByTopic.xml?topic={topic}&limit=5
You can also narrow the search for messages by using a “startDate” and/or “endDate” parameters in the URL string. Remember that the URL string must be case-sensitive for these parameters. The startDate and endDate must be specified as milliseconds since January 1, 1970; or they can be specified as a string following the ISO 8601 format.
Thus, the following two queries are equivalent, giving the last 5 messages from between the dates of 01-Sep-2012 12:00:00 and 10-Sep-2012 12:00:00.
To convert between timestamps and milliseconds, there are a number of conversion utilities online, such as http://www.epochconverter.com/ or http://unixtimestamp.50x.eu/. Note, however, that these utilities yield the conversions in seconds, so when using long integers in the URL you must ensure that the number is multiplied by 1000 to become milliseconds.
Display List of Rules
The Rules API returns a list of rules on your Everyware Cloud account. Enter the following URL into your Web browser:
https://api-sandbox.everyware-cloud.com/v2/rules.xml
The following screen capture shows the list of rules displayed. This example shows one sample rule that was previously configured in the Everyware Cloud Console.
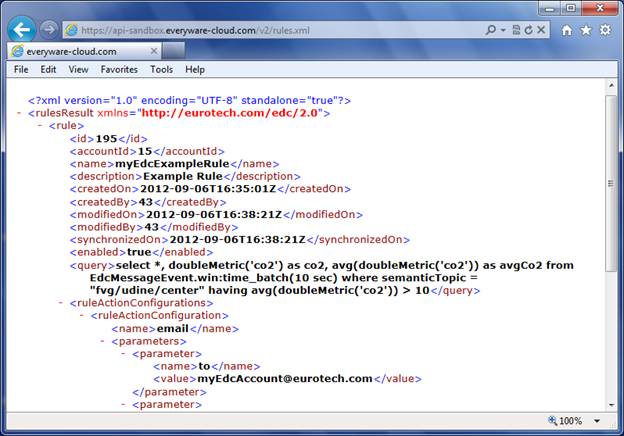
Refer to the “Rules” section of the REST APIs referenced in the Overview of this document for more options on the REST parameters available. The following is an additional example.
Show the details for only one rule (use the rule number in place of {ruleID}):
https://api-sandbox.everyware-cloud.com/v2/rules/{ruleID}.xml
View User and Account Settings
The Users and Accounts APIs give information about the account settings of your Everyware Cloud account. To list the users on your account, enter the following URL into your Web browser:
https://api-sandbox.everyware-cloud.com/v2/users.xml
To see a list of accounts that are visible to your login, enter the following URL into your Web browser:
https://api-sandbox.everyware-cloud.com/v2/accounts.xml
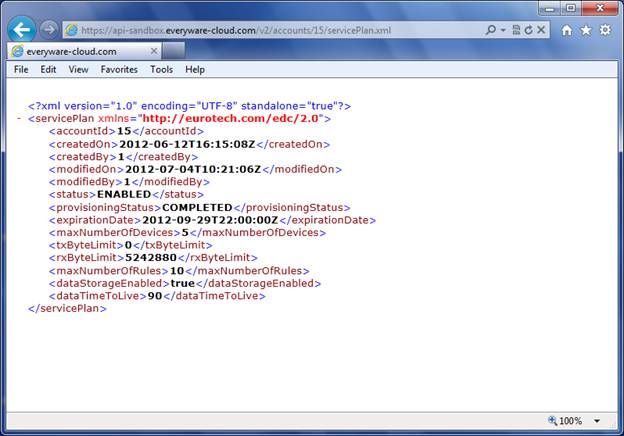
To see details of your service plan, enter the following URL (with actual account ID in place of “{accountID}”):
https://api-sandbox.everyware-cloud.com/v2/accounts/{accountID}/servicePlan.xml
The following screen capture shows the details of the service plan displayed.
To view the account usage in bytes, enter the following URL (with actual Account ID in place of “{accountID}”):
https://api-sandbox.everyware-cloud.com/v2/accounts/{accountID}/usageByDay.xml
Refer to the “Users” and “Accounts” sections of the REST APIs referenced in the Overview of this document for more options on the REST parameters available.
Use REST API to Display Data – JSON Format
All of the previous examples of REST APIs in this section have been in the XML format. This is more human-readable and easier for demonstration purposes. But another commonly used protocol is JSON (JavaScript Object Notation), which is a text-based standard for representing data structures and arrays. Despite its original association with Javascript, JSON can be parsed in many computer-based languages to convert the content into a usable data structure programmatically.
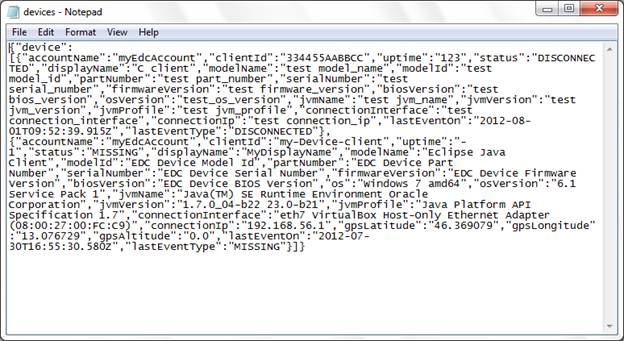
All of the APIs can be represented in JSON just as easily as with XML, using an identical syntax. Simply substitute “.json” in place of “.xml”. To give just one example, let’s show again the list of devices, this time in JSON format.
Enter the following URL into the browser:
https://api-sandbox.everyware-cloud.com/v2/devices.json
or
https://api-sandbox.everyware-cloud.com/v2/devices.json?limit=10
If the data doesn’t display natively in the browser, you may be prompted to “Open” or “Save” a file. Open the file with a text editor to show its contents, as shown in the following screen capture.
See the site http://www.json.org for more help on understanding the JSON protocol.