
Version 3.0 - Legacy
Last: Vers. 5.9 - 2022
- Developers' Guide
- Introduction
- Administrator's Guide
- Connecting to Everyware Cloud
- REST APIs
- Supplementary Documentation


PART 3. CONNECTING
DEVICES TO THE EVERYWARE™ CLOUD
Publishing GPS Data to the Cloud
Publishing GPS Data to the Cloud
· Overview
Import Java Client GPS Project
Using Java Client GPS Application
Publishing GPS Data to the Cloud
Overview
In this example, you will use Eclipse to create a stand-alone MQTT client in Java that simulates an actual device publishing data to the Everyware Cloud. It builds on the example described in Connecting to the Cloud in Java by illustrating how to publish GPS data using the Everyware™ Cloud Communication Data Model. This example uses a GPS simulator to create a changing GPS position.
In this tutorial, you will:
- Import the sample Java Client GPS project into Eclipse
- Publish GPS data to the Everyware Cloud
- View the data in real time
Prerequisites
The Everyware Cloud example code is available on the GitHub repository at https://github.com/eurotech/edc-examples/. Make sure before continuing with this example that you have set up your Eclipse workspace, installed Maven, and downloaded the example code (see Setting up Eclipse Environment for Java).
Import Java Client GPS Project
In Eclipse select File | Import, if you have not already imported the “edc-java-client-gps” project. Select “General | Existing Projects into Workspace,” then click Next. Click Browse for the root directory, and browse to the workspace location of the cloud examples that were downloaded and installed previously. Select the “edc-java-client-gps” project folder, but do not enable the checkbox “Copy projects into workspace” (the projects are already in the workspace location). (If you wish, you may import all projects, but this tutorial will only discuss the Java client GPS project.) You may add the project to a working set if desired. Then click Finish.
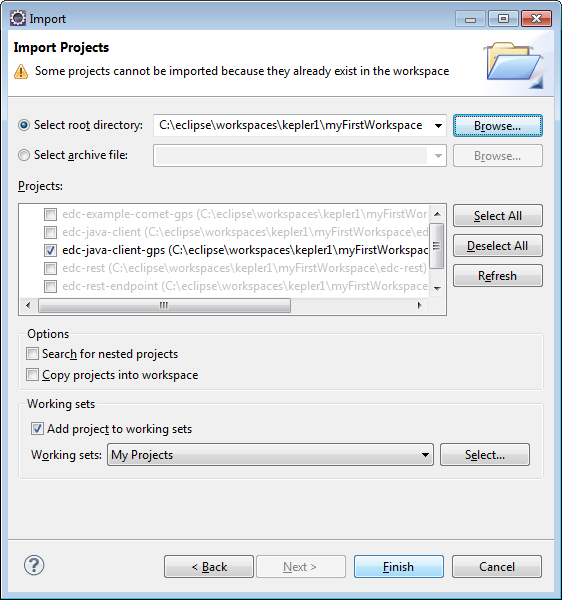
You should now have the “edc-java-client-gps” project in your workspace.
NOTE: If you delete the project out of the workspace later, you should not “Delete project contents on disk.” This is because we have used the Maven install procedures to setup the projects directly into your Eclipse workspace location. If you do delete the contents on disk, you would need to create a new workspace and re-download the source code from Eurotech’s software repository, as described in Setting up Eclipse Environment for Java.
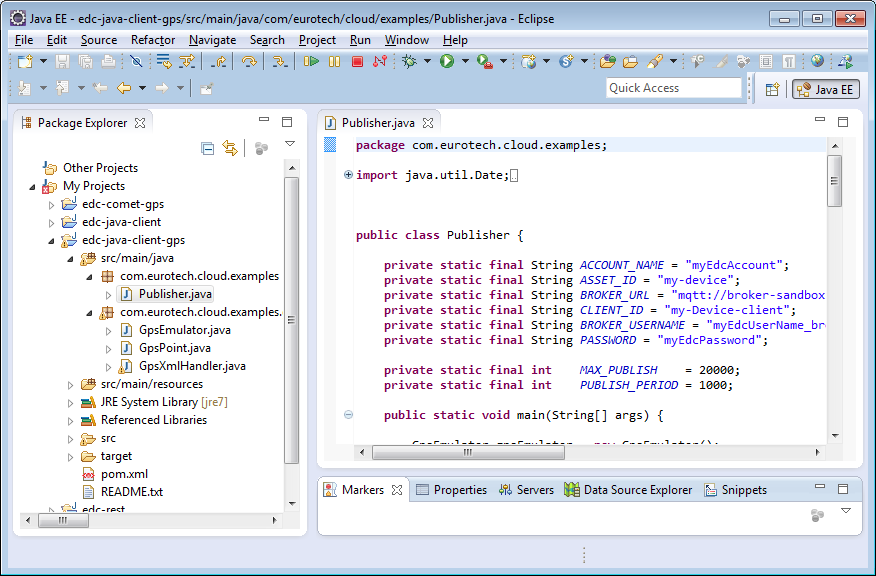
Set Publisher Variables
Toward the top of the code example, there are several variables noted with comments that are specific to your Cloud user account. These variables need to be modified according to your Cloud account credentials, so the Java client can connect properly. See the section Accessing your Cloud Account to set up an account in Everyware Cloud.
In the sample code, set the following variables with the proper settings of your Cloud broker account, and save changes:
|
private static final String ACCOUNT_NAME = "myEdcAccount"; // Your Account name in Cloud private static final String ASSET_ID = "my-device"; // Unique Asset ID of this client device private static final String BROKER_URL = "mqtt://broker-sandbox.everyware-cloud.com:1883/"; // URL address of broker private static final String CLIENT_ID = "my-Device-client"; // Unique Client ID of this client device private static final String BROKER_USERNAME = "myEdcUserName"; // Username in account, to use for publishing private static final String PASSWORD = "myEdcPassword"; // Password associated with Username
|
Using Java Client GPS Application
The following sections describe the Java Client GPS application and give portions of the relevant code. See the full Java source code for more details on the program operation.
Starting Cloud Connection
After the client variables have been modified, make a
connection to the Cloud by selecting the Run menu, and the option “Run” or “Run
as...Java Application”. You can also select the green Run button ![]() in the Launch toolbar.
in the Launch toolbar.
If you have the proper credentials and have entered them correctly in the code, you should see the debug statements in the Java Console that indicate you have made a successful connection.
15:36:56,491 [main] INFO EdcCloudClientImpl:79 - # ------------------------------------------------------------
15:36:56,507 [main] INFO EdcCloudClientImpl:80 - # Eurotech Everyware Cloud Client
15:36:56,507 [main] INFO EdcCloudClientImpl:81 - # Version: 2.0.2
15:36:56,507 [main] INFO EdcCloudClientImpl:82 - # Build Version: bb62c8d314be2f7ad822d6225071847fc69f0c4e
15:36:56,508 [main] INFO EdcCloudClientImpl:83 - # Build Number: sbx-57
15:36:56,510 [main] INFO EdcCloudClientImpl:84 - # ------------------------------------------------------------
15:36:56,603 [main] INFO EdcCloudClientImpl:156 - # ------------------------------------------------------------
15:36:56,604 [main] INFO EdcCloudClientImpl:157 - # Connection Properties
15:36:56,604 [main] INFO EdcCloudClientImpl:158 - # broker = mqtt://broker-sandbox.everyware-cloud.com:1883/
15:36:56,604 [main] INFO EdcCloudClientImpl:159 - # clientId = my-Device-client
15:36:56,604 [main] INFO EdcCloudClientImpl:160 - # account = myEdcAccount
15:36:56,604 [main] INFO EdcCloudClientImpl:161 - # username = myEdcUserName
15:36:56,604 [main] INFO EdcCloudClientImpl:162 - # password = XXXXXXXXXXXXXX
15:36:56,604 [main] INFO EdcCloudClientImpl:163 - # keepAlive = 30
15:36:56,604 [main] INFO EdcCloudClientImpl:164 - #
15:36:56,604 [main] INFO EdcCloudClientImpl:165 - # Connecting...
15:36:56,727 [main] INFO EdcCloudClientImpl:188 - # Connected.
15:36:56,727 [main] INFO EdcCloudClientImpl:189 - # Publishing birth certificate on $EDC/myEdcAccount/my-Device-client/MQTT/BIRTH...
15:36:56,980 [main] INFO EdcCloudClientImpl:204 - # Completed.
15:36:56,980 [main] INFO EdcCloudClientImpl:205 - # ------------------------------------------------------------
Session started
If not configured correctly, there will be an error in the console.
Publishing GPS Data
After successfully connecting, the application publishes GPS data to the Cloud. The createPayload() method creates an edcPayload() object and populates it with data from the GPS simulator.
|
for (int i = 0; i < MAX_PUBLISH; i++) { edcCloudClient.publish(semanticTopic, createPayload(gpsEmulator, i).toByteArray(), 1, false); //call createPayload() each time Thread.sleep(PUBLISH_PERIOD);EdcCloudClient edcCloudClient = null;
|
You should see the following debug statements in the Java Console that indicate data is being published.
publish on topic: gps/data
15:36:56,980 [main] INFO EdcCloudClientImpl:255 - [my-Device-client] Publishing on topic: myEdcAccount/my-device/gps/data
15:36:56,981 [main] INFO EdcCloudClientImpl:258 - [my-Device-client] Publishing message with ID: 2
15:36:57,056 [Thread-1] INFO EdcCloudClientImpl:495 - [my-Device-client] Message published with ID = 2
The GPS simulator provides data with a changing latitude, longitude, altitude, and timestamp.
|
private static EdcPayload createPayload(GpsEmulator gpsEmulator, int counter) { //create payload EdcPayload edcPayload = new EdcPayload();
//timestamp the payload Date capturedOn = new Date(); edcPayload.setTimestamp(capturedOn);
//use a simulated and changing GPS position EdcPosition position = new EdcPosition(); position.setLatitude(gpsEmulator.getLatitude()); position.setLongitude(gpsEmulator.getLongitude()); position.setSpeed(60); position.setHeading(0); position.setAltitude(gpsEmulator.getAltitude()); position.setPrecision(10); position.setSatellites(3); position.setStatus(1); position.setTimestamp(new Date(gpsEmulator.getTime()));
//set position in payload, published with every message edcPayload.setPosition(position);
return edcPayload;
|
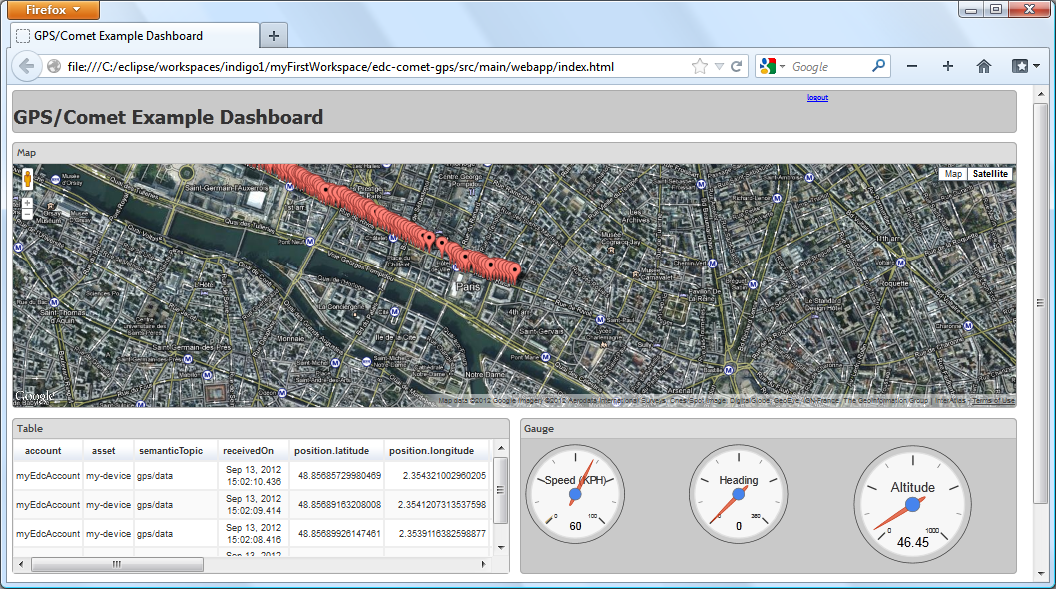
Viewing the Data
You can view the data published by this example in real-time using a sample dashboard built with Google Chart Tools and the EDC Comet API. You should have already downloaded the edc-comet-gps example available on the GitHub repository at https://github.com/eurotech/edc-examples/.
In your workspace under edc-comet-gps/src/main/webapp, open
the file index.html using
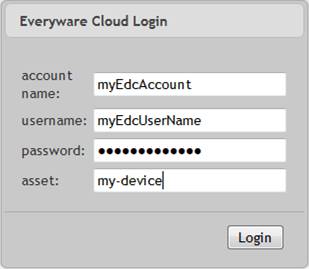
the Firefox or Safari Web browser. Enter the Cloud account credentials used earlier
in Set Publisher Variables.
The following screen capture shows the dashboard.
For additional details about using your Everyware Cloud account as a data source for Google Charts, see the section on Google Chart Tools Support. For additional details about the EDC Comet API, see the section on Asynchronous REST/Comet API. You are encouraged to explore these powerful capabilities for use in your application.