
Version 3.0 - Legacy
Last: Vers. 5.9 - 2022
- Developers' Guide
- Introduction
- Administrator's Guide
- Connecting to Everyware Cloud
- REST APIs
- Supplementary Documentation


PART 3. CONNECTING
DEVICES TO THE EVERYWARE™ CLOUD
Connecting to the Cloud in Java
Connecting to the Cloud in Java
· Overview
Connecting to the Cloud in Java
Overview
In this example, we will use Eclipse to create a stand-alone MQTT client in Java that implements Everyware™ Cloud Communication Data Model. The client will simulate an actual device, publishing data to the platform using the MQTT transport protocol, and subscribing to certain topics. This will give us a test framework to more readily test all aspects of data transfer throughout the Everyware Cloud.
In this section you will learn how to:
- Import the sample Java Client project into Eclipse
- Publish data to the cloud
- Subscribe to a topic namespace in the cloud
Prerequisites
The Everyware Cloud example code is available on the GitHub repository at https://github.com/eurotech/edc-examples/. Make sure before continuing with this example that you have set up your Eclipse workspace, installed Maven, and downloaded the example code (see Setting up Eclipse Environment for Java).
Import Java Client Project
In Eclipse, select File | Import. Select “General | Existing Projects into Workspace,” then click Next. Click Browse for the root directory, and browse to the workspace location of the cloud examples that were downloaded and installed previously. Select the “edc-java-client” project folder, but do not enable the checkbox “Copy projects into workspace” (the projects are already in the workspace location). (If you wish, you may import all the projects, but this tutorial only discusses the EDC Java client.) You may add the projects to a working set if desired. Then click Finish.
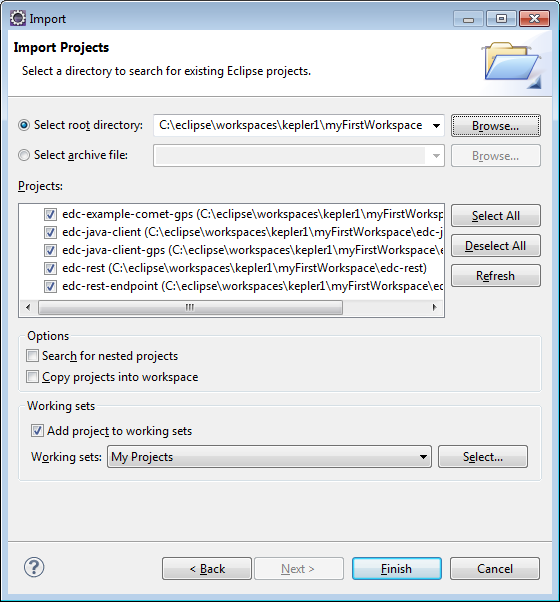
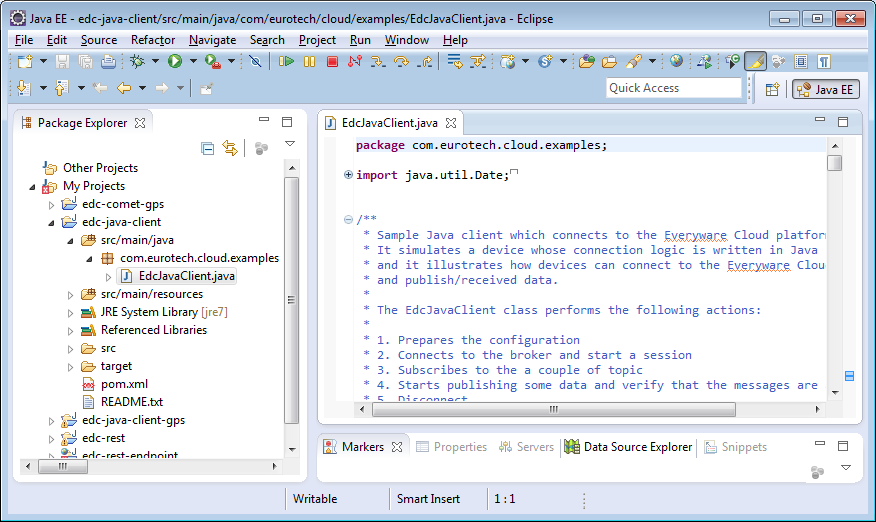
You should now have the “edc-java-client” project in your workspace, and it should not show any build errors.
NOTE: If you delete the project out of the workspace later, you should not “Delete project contents on disk.” This is because we have used the Maven install procedures to setup the projects directly into your Eclipse workspace location. If you do delete the contents on disk, you would need to create a new workspace and re-download the source code from Eurotech’s software repository, as described in Setting up Eclipse Environment for Java.
Set Java Client Variables
Toward the top of the code example, there are several variables noted with comments, which are specific to your Cloud user account. These variables need to be modified according to your Cloud account credentials, so the Java client can connect properly. See the section Accessing your Cloud Account to set up an account in Everyware Cloud.
In the sample code, set the following variables with the proper settings of your Cloud broker account, and save changes:
|
// >>>>>> Set these variables according to your Cloud user account // private static final String ACCOUNT_NAME = "myEdcAccount"; // Your Account name in Cloud private static final String ASSET_ID = "my-Device"; // Unique Asset ID of this client device private static final String BROKER_URL = "mqtt://broker-sandbox.everyware-cloud.com:1883"; // URL address of broker private static final String CLIENT_ID = "my-Device-client"; // Unique Client ID of this client device private static final String USERNAME = "myEdcUserName_broker"; // Username in account, to use for publishing private static final String PASSWORD = "myEdcPassword3#"; // Password associated with Username // // <<<<<<<<<<<<<<<<<<<<<<<<<<<<<<<<<<<<<<<<<<<<<<<<<<<<<<<<<<<<<
|
Using Java Client Application
The following sections describe the Java Client application and give portions of the relevant code. See the full Java source code for more details on the program operation.
Starting Cloud Connection
After the client variables have been modified, make a
connection to the Cloud by selecting the Run menu, and the option “Run” or “Run
as...Java Application”. You can also select the green Run button ![]() in the Launch toolbar.
in the Launch toolbar.
This Java code example starts in the main() method by creating an instance of the EDCConfiguration and sets up its identity as a device which will be connecting to the Everyware Cloud. Then it starts a session, which makes an IP connection to the cloud.
|
EdcConfigurationFactory confFact = EdcConfigurationFactory.getInstance(); EdcConfiguration conf = confFact.newEdcConfiguration(ACCOUNT_NAME, ASSET_ID, BROKER_URL, CLIENT_ID, USERNAME, PASSWORD); EdcDeviceProfileFactory profFactory = EdcDeviceProfileFactory.getInstance(); EdcDeviceProfile prof = profFactory.newEdcDeviceProfile(); prof.setDisplayName("MyDisplayName"); // friendly name for this CLIENT_ID, for display in the Cloud prof.setModelName("Eclipse Java Client");
|
The EdcClientFactory is instantiated, using this Java client as a callback.
|
EdcCloudClient edcCloudClient = null; edcCloudClient = EdcClientFactory.newInstance(conf, prof, new EdcJavaClient()); edcCloudClient.startSession();
|
If you have the proper credentials and have entered them correctly in the code, you should see the debug statements in the Java Console that indicate you have made a successful connection and are publishing and receiving subscribed data.
13:09:29,318 [main] INFO EdcCloudClientImpl:79 - # ------------------------------------------------------------
13:09:29,333 [main] INFO EdcCloudClientImpl:80 - # Eurotech Everyware Cloud Client
13:09:29,333 [main] INFO EdcCloudClientImpl:81 - # Version: 3.0.3
13:09:29,333 [main] INFO EdcCloudClientImpl:82 - # Build Version: d4a2723a52796be508906a1a12d7a48707ff6506
13:09:29,333 [main] INFO EdcCloudClientImpl:83 - # Build Number: sbx-73
13:09:29,333 [main] INFO EdcCloudClientImpl:84 - # ------------------------------------------------------------
13:09:29,333 [main] INFO EdcCloudClientImpl:156 - # ------------------------------------------------------------
13:09:29,333 [main] INFO EdcCloudClientImpl:157 - # Connection Properties
13:09:29,333 [main] INFO EdcCloudClientImpl:158 - # broker = mqtt://broker-sandbox.everyware-cloud.com:1883
13:09:29,333 [main] INFO EdcCloudClientImpl:159 - # clientId = my-Device-client
13:09:29,333 [main] INFO EdcCloudClientImpl:160 - # account = myEdcAccount
13:09:29,333 [main] INFO EdcCloudClientImpl:161 - # username = myEdcUserName_broker
13:09:29,333 [main] INFO EdcCloudClientImpl:162 - # password = XXXXXXXXXXXXXX
13:09:29,333 [main] INFO EdcCloudClientImpl:163 - # keepAlive = 30
13:09:29,333 [main] INFO EdcCloudClientImpl:164 - #
13:09:29,333 [main] INFO EdcCloudClientImpl:165 - # Connecting...
13:09:29,645 [main] INFO EdcCloudClientImpl:188 - # Connected.
13:09:29,645 [main] INFO EdcCloudClientImpl:189 - # Publishing birth certificate on $EDC/myEdcAccount/my-Device-client/MQTT/BIRTH...
13:09:29,676 [main] INFO EdcCloudClientImpl:204 - # Completed.
13:09:29,676 [main] INFO EdcCloudClientImpl:205 - # ------------------------------------------------------------
Session started
If not configured correctly, there will be an error in the console.
Subscribe to Data
Next, the application issues a few subscription requests to the cloud (for data topics, and control topics such as birth certificates), so that we can receive back a copy of the messages that we will later publish. See Introduction to MQTT Protocol for more information on subscription topics.
|
edcCloudClient.subscribe("#", 1); edcCloudClient.controlSubscribe("+", "#", 1);
|
Because the application has subscribed to the topic “#”, you automatically receive back all messages that your client (or any other client on this account) publishes to the Cloud.
Subscribe to data topics of all assets in the account
13:09:29,676 [main] INFO EdcCloudClientImpl:404 - [my-Device-client] Subscribing on topic: myEdcAccount/my-Device/#, QoS: 1
Subscribe to control topics of all assets in the account
13:09:29,676 [main] INFO EdcCloudClientImpl:404 - [my-Device-client] Subscribing on topic: $EDC/myEdcAccount/+/#, QoS: 1
Subscribe message ID: 2 confirmed
Subscribe message ID: 3 confirmed
Publish Data
Then a series of messages is published by the application. The createPayload() method creates an edcPayload() object and populates it with various sample metrics of different data types, including an incrementing counter value (Metric: “counter”) and a GPS position that varies randomly.
|
edcCloudClient.publish(pubTSemanticTopic, createPayload(i), 1, false); //call createPayload() each time
|
publish on data semantic topic: sample/data
13:37:32,905 [main] INFO EdcCloudClientImpl:255 - [my-Device-client] Publishing on topic: myEdcAccount/my-Device/sample/data
13:37:32,905 [main] INFO EdcCloudClientImpl:258 - [my-Device-client] Publishing message with ID: 4
13:37:33,232 [Thread-1] INFO EdcCloudClientImpl:495 - [my-Device-client] Message published with ID = 4
Publish message ID: 4 confirmed
Receive Subscription
Because of the subscriptions created earlier, we receive back into our client the same messages that we just published. The controlArrived() or publishArrived() callbacks display the contents of the messages received as a result of a subscription.
|
//display data messages received from broker public void publishArrived(String assetId, String topic, EdcPayload msg, int qos, boolean retain) {
System.out.println("Data publish arrived on semantic topic: " + topic + ", qos: " + qos + ", assetId: " + assetId);
// Print all the metrics for (String name : msg.metricNames()) { String content = ""; if (msg.getMetric(name).getClass().isArray()) { //display byte arrays as both hex characters and String byte[] contentArray = (byte[]) msg.getMetric(name); for (int i = 0; i < contentArray.length; i++) { content = content + Integer.toHexString(0xFF & contentArray[i]) + " ";
} content = content + " (as String: '" + new String(contentArray) + "')"; } else { content = msg.getMetric(name).toString(); } System.out.println(name + ":" + content); } }
|
The publishArrived() callback parses through each Metric in the EDC message payload, and displays the contents in the Java console.
13:37:33,529 [Thread-1] INFO EdcCloudClientImpl:578 - [my-Device-client] Publish arrived on topic "myEdcAccount/my-Device/sample/data"
13:37:33,529 [Thread-1] INFO EdcCloudClientImpl:606 - [my-Device-client] Publish arrived for device ID: my-Device
Data publish arrived on semantic topic: sample/data, qos: 1, assetId: my-Device
str:this is a string
arr:31 32 33 (as String: '123')
int:100
counter:0
flt:0.48677376
dbl:0.4658338055366993
bool:true
long:200000
Finally, the application sleeps for several seconds to keep the connection alive and to receive any last subscribed messages that might be received, and then the cloud client session is terminated.
|
edcCloudClient.stopSession(); edcCloudClient.terminate();
|
This is the end of this example code. See the section on Viewing Device Data to verify that the data being published from this Java client is arriving in the Cloud broker.