
Version 3.0 - Legacy
Last: Vers. 5.9 - 2022
- Developers' Guide
- Introduction
- Administrator's Guide
- Connecting to Everyware Cloud
- REST APIs
- Supplementary Documentation


PART 3. CONNECTING
DEVICES TO THE EVERYWAREÖ CLOUD
Connecting to the Cloud in C++
Connecting to the Cloud in C++
Ę Overview
Connecting to the Cloud in C++
Overview
In this example, we will create a stand-alone MQTT client in C++ that implements EverywareÖ Cloud Communication Data Model.Ā The client will simulate an actual device, publishing data to the platform using the MQTT transport protocol, and subscribing to certain topics.Ā This will give us a test framework to more readily test all aspects of data transfer throughout the Everyware Cloud.
In this section you will learn how to:
- Obtain the sample C++ Client project
- Publish data to the cloud
- Subscribe to a topic namespace in the cloud
Prerequisites
This example assumes that you have a working knowledge of writing C++ code and working with a æCÆ compiler.Ā Instructions are given here for compiling and running the æCÆ Client project in Linux using the ægccÆ compiler, but you could also use a compiler of your choice, such as Visual Studio (2005 or higher).
Set up æCÆ Client Project
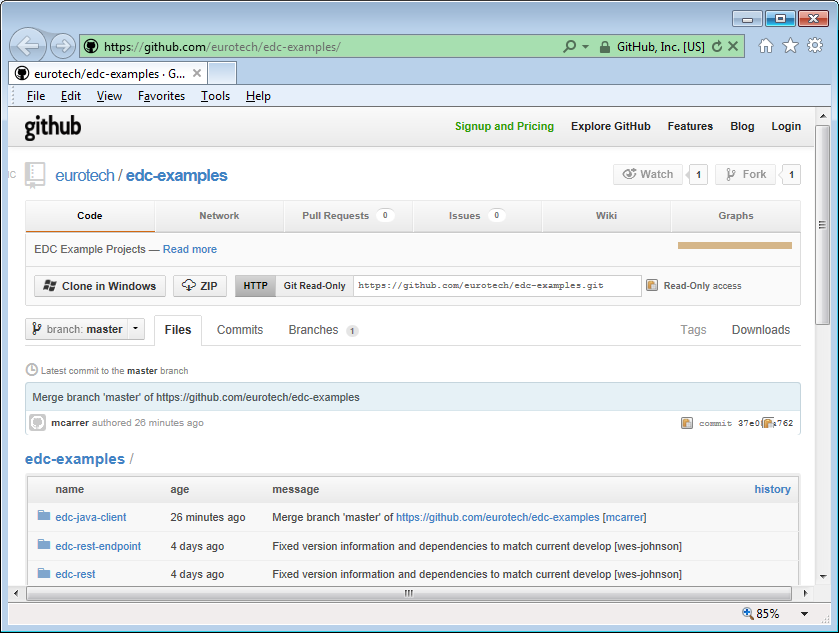
The Everyware Cloud example code is available on the GitHub repository at https://github.com/eurotech/edc-examples/.Ā Browse to the Eurotech ōedc-examplesö GitHub repository, and click on the ōZIPö icon to download the sample Cloud applications as a Zip file.
Extract the contents of the Zip file to put the source code into a working location for your development.Ā See the edc-c-client/readme file for more details on the project.
Set Client Variables
Change directory to the edc-c-client/edctest directory of the source code.Ā Edit the file edctest.cpp.Ā Toward the top of this file, there are several variables noted with comments, which are specific to your Cloud user account.Ā These variables need to be modified according to your Cloud account credentials, so the æCÆ client can connect properly.Ā See the section Accessing your Cloud Account to set up an account in Everyware Cloud.
In the edctest.cpp file, set the following variables with the proper settings of your Cloud broker account, and save changes:
|
// >>>>>> Set these variables according to your Cloud user account #define TEST_ACCOUNT_NAMEĀĀĀĀĀ "myEdcAccount" ĀĀĀĀĀĀĀ ĀĀĀĀĀĀĀ // Your Account name in Cloud #define TEST_BROKER_URLĀĀĀĀĀĀĀ "tcp://broker-sandbox.everyware-cloud.com:1883/"ĀĀĀĀĀ ĀĀĀĀĀĀĀ // URL address of broker #define TEST_CLIENT_IDĀĀĀĀĀĀĀĀ "001122DDEEFF" ĀĀĀĀĀĀĀ ĀĀĀĀĀĀĀ // Unique Client ID of this client device #define TEST_ASSET_IDĀĀĀĀĀĀĀĀĀ "334455AABBCC" ĀĀĀĀĀĀĀ ĀĀĀĀĀĀĀ // Unique Asset ID of this client device #define TEST_USERNAMEĀĀĀĀĀĀĀĀĀ "myEdcUserName_broker" ĀĀĀĀĀĀĀ // Username in account, to use for publishing #define TEST_PASSWORDĀĀĀĀĀĀĀĀĀ "myEdcPassword3#"ĀĀĀĀĀĀĀĀĀĀĀĀĀ // Password associated with Username // <<<<<<<<<<<<<<<<<<<<<<<<<<<<<<<<<<<<<<<<<<<<<<<<<<<<<<<<<<<<<
|
Compile Project in Linux
To compile the project in Linux, change to the æedc-c-clientÆ directory, then issue the following commands:
chmod u+x build.sh
./build.sh
Compile Project in Windows
The edc-c-client package folder includes a Visual Studio 2005 solution file (ESD.sln) in order to easily build the project on a Windows PC. The rest of this section gives detailed steps about building the edc-c-client solution using Visual C++ 2010 Express IDE that can be downloaded for free from the Microsoft web site.
Ę Download the Visual C++ 2010 ExpressĀ web installer from http://www.microsoft.com/visualstudio/en-us/products/2010-editions/visual-cpp-express.
Ę Run the installer application keeping the default install options to install the Visual C++ 2010 ExpressĀ IDE on your PC.
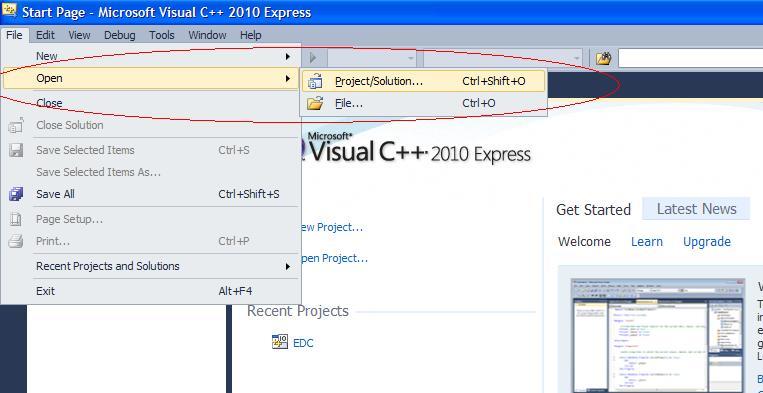
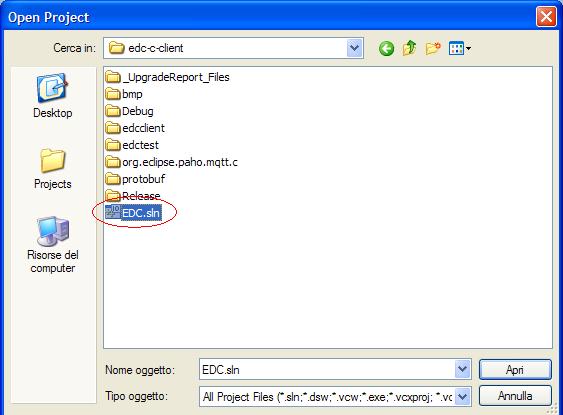
Ę Run Visual C++ 2010 Express, select File | Open | Project/Solutionģ and browse to the æEDC.slnÆ file in the edc-c-client folder
The IDE will runĀ the Visual Studio Conversion Wizard:
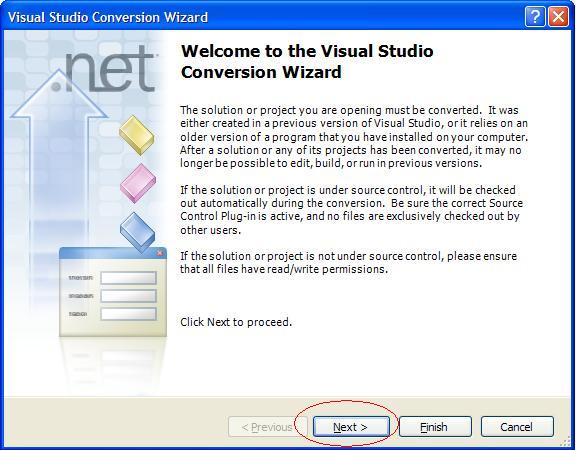
Click the Next button and follow the wizard instruction keeping the default options.
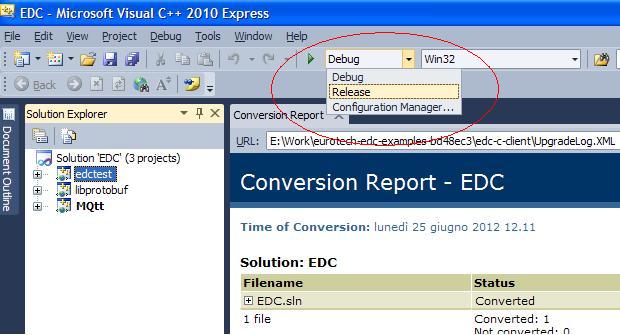
Ę Once the conversion has completed select the desired build configuration (the default one is Debug) from the menu:
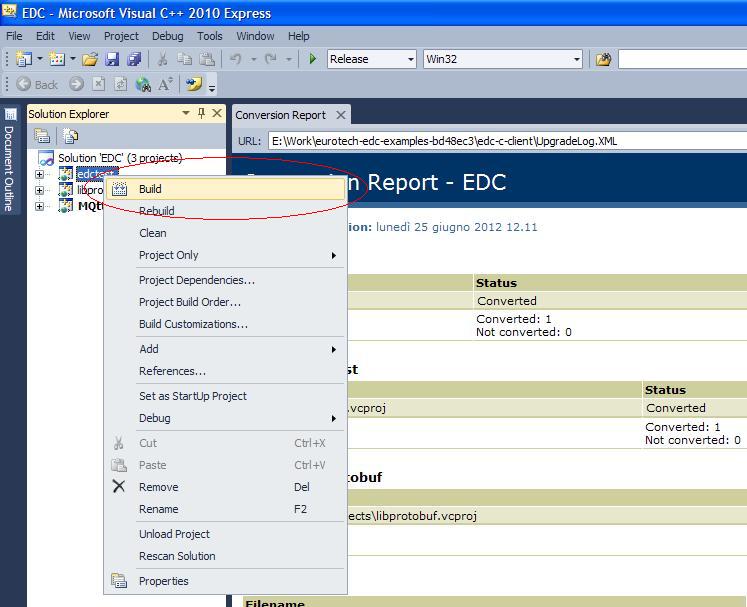
Ę Right click on the edctest project and select Build:
Ę Once the build has completed successfully you should see the following in the IDE Output window:

Using C++ Client Application
The following sections describe the æCÆ Client application.
Starting Cloud Connection
After the code has been compiled:
Ę Under Linux:change to the edc-c-client/edctest directory, and execute the run.sh script.
Ę Under Windows: browse to the edc-c-client\release or the edc-c-client\debug directory, according to the build configuration you selected, and execute edctest.exe
This C++ code example starts in the main() method by creating an instance of the EDCConfiguration and sets up its identity as a device which will be connecting to the Everyware Cloud.Ā Then it starts a session, which makes an IP connection to the cloud.
|
ĀĀĀĀĀĀĀ //Create client configuration, and set its propertiesĀĀĀĀĀĀĀ EdcConfiguration conf; ĀĀĀĀĀĀĀ conf.setAccountName(TEST_ACCOUNT_NAME); ĀĀĀĀĀĀĀ conf.setBrokerUrl(TEST_BROKER_URL); ĀĀĀĀĀĀĀ conf.setClientId(TEST_CLIENT_ID); ĀĀĀĀĀĀĀ conf.setDefaultAssetId(TEST_ASSET_ID); ĀĀĀĀĀĀĀ conf.setUsername(TEST_USERNAME); ĀĀĀĀĀĀĀ conf.setPassword(TEST_PASSWORD); ĀĀĀĀĀĀĀ //Create device profile and set its propertiesĀĀĀĀĀĀĀ EdcDeviceProfile prof; ĀĀĀĀĀĀĀ prof.setDisplayName(TEST_ASSET_ID); ĀĀĀĀĀĀĀ prof.setModelName("Native EDC Client");
|
The EdcClientFactory is instantiated, using this C++ client as a callback.
|
ĀĀĀĀĀĀĀ //Create cloud client instanceĀĀĀĀĀĀĀ edcCloudClient = EdcCloudClient(&conf, &prof, ĀĀĀĀĀĀĀĀĀĀĀĀĀĀĀĀĀĀĀĀĀĀĀĀĀĀĀĀĀĀĀĀĀĀĀĀĀĀĀĀĀĀĀĀĀĀĀĀĀĀĀĀĀĀĀĀĀĀĀĀ EdcCloudClientMessageArrived, ĀĀĀĀĀĀĀĀĀĀĀĀĀĀĀĀĀĀĀĀĀĀĀĀĀĀĀĀĀĀĀĀĀĀĀĀĀĀĀĀĀĀĀĀĀĀĀĀĀĀĀĀ ĀĀĀĀĀĀĀ EdcCloudClientMessageDelivered, ĀĀĀĀĀĀĀĀĀĀĀĀĀĀĀĀĀĀĀĀĀĀĀĀĀĀĀĀĀĀĀĀĀĀĀĀĀĀĀĀĀĀĀĀĀĀĀĀĀĀĀĀĀĀĀĀĀĀĀĀ //Don't pass a connection lost callbackĀĀĀĀĀĀĀĀĀĀĀĀĀĀĀĀĀĀĀĀĀĀĀĀĀĀĀĀĀĀĀĀĀĀĀĀĀĀĀĀĀĀĀĀĀĀĀĀĀĀĀĀĀĀĀĀĀĀĀĀ //so the client will reconnect automaticallyĀĀĀĀĀĀĀĀĀĀĀĀĀĀĀĀĀĀĀĀĀĀĀĀĀĀĀĀĀĀĀĀĀĀĀĀĀĀĀĀĀĀĀĀĀĀĀĀĀĀĀĀĀĀĀĀĀĀĀĀ 0);
|
If you have the proper credentials and have entered them correctly in the code, you should see the debug statements in stdout that indicate you have made a successful connection and are publishing and receiving subscribed data.Ā
EDC test start
Start session...
If not configured correctly, there will be an error in stdout, such as:
startSession failed with error code -1
MQTTclient, generic operation failure
Subscribe to Data
Next, the application issues a few subscription requests to the cloud (for data topics, and control topics such as birth certificates), so that we can receive back a copy of the messages that we will later publish.Ā See Introduction to MQTT Protocol for more information on subscription topics.
|
ĀĀĀĀĀĀĀ string accountSemanticTopics = "#"; ĀĀĀĀĀĀĀ string accountControlTopics = "#"; ĀĀĀĀĀĀĀ //subscribe to all data topicsĀĀĀĀĀĀĀ int qoss = 1; ĀĀĀĀĀĀĀ rc = edcCloudClient.subscribe(accountSemanticTopics, qoss); ĀĀĀĀĀĀĀ //subscribe to all control topicsĀĀĀĀĀĀĀ rc = edcCloudClient.controlSubscribe(accountControlTopics, qoss); |
Because the application has subscribed to the topic ō#ö, you automatically receive back all messages that your client (or any other client on this account) publishes to the Cloud.
Publish Data
Then a series of messages is published by the application.Ā The createPayload() method creates an EdcPayload() structure and populates it with various sample metrics of different data types, including an incrementing counter value (Metric: ōcounterö) and a GPS position that varies randomly.
|
EdcPayload * payload = createPayload(); rc = edcCloudClient.publish(pubTSemanticTopic, payload, qoss, false, PUBLISH_TIMEOUT);ĀĀĀĀĀĀĀ //call createPayload() each time
|
Publish #1 succeeded, semantic topic=nativeclient/data
Ā timestamp: 1340336705
Ā position latitude: 846930931.869079
Ā position longitude: 1804289395.576729
Ā position altitude: 296.000000
Ā position precision: 10.000000
Ā position heading: 2.000000
Ā position speed: 60.000000
Ā position timestamp: 1340336705
Ā position satellites: 3
Ā position status: 1
Ā metric #0 name: counter
Ā metric #0 type: 3
Ā metric #0 int_value: 1
Ā metric #1 name: str
Ā metric #1 type: 5
Ā metric #1 string_value: this is a string
Ā metric #2 name: int
Ā metric #2 type: 3
Ā metric #2 int_value: 1
Ā metric #3 name: flt
Ā metric #3 type: 1
Ā metric #3 float_value: 2.718282
Ā metric #4 name: dbl
Ā metric #4 type: 0
Ā metric #4 double_value: 0.841471
Ā metric #5 name: long
Ā metric #5 type: 2
Ā metric #5 long_value: 100000
Ā metric #6 name: bool
Ā metric #6 type: 4
Ā metric #6 bool_value: 0
Ā metric #7 name: arr
Ā metric #7 type: 6
Ā metric #7 bytes_value: 0x31 0x32 0x33
Receive Subscription
Because of the subscriptions created earlier, we receive back into our client the same messages that we just published.Ā The EdcCloudClientMessageArrived() callback displays the contents of the messages received as a result of a subscription.
|
//callback for message arrivedint EdcCloudClientMessageArrived(string topic, EdcPayload * payload){ ĀĀĀĀĀĀĀ static int rxMsgCount = 0; ĀĀĀĀĀĀĀ rxMsgCount ++; ĀĀĀĀĀĀĀ printf("Message #%d arrived: topic=%s\r\n", rxMsgCount, topic.c_str()); #ifdef DISPLAY_RX_MSG_PAYLOADĀĀĀĀĀĀĀ if (payload != 0){ ĀĀĀĀĀĀĀĀĀĀĀĀĀĀ displayPayload(payload); ĀĀĀĀĀĀĀ }#endifĀĀĀĀĀĀĀ return 0; }
|
The displayPayload() parses through each Metric in the EDC message payload and displays the contents.
Message #1 arrived: topic=myEdcAccount/334455AABBCC/nativeclient/data
Ā timestamp: 1340336705
Ā position latitude: 846930931.869079
Ā position longitude: 1804289395.576729
Ā position altitude: 296.000000
Ā position precision: 10.000000
Ā position heading: 2.000000
Ā position speed: 60.000000
Ā position timestamp: 1340336705
Ā position satellites: 3
Ā position status: 1
Ā metric #0 name: counter
Ā metric #0 type: 3
Ā metric #0 int_value: 1
Ā metric #1 name: str
Ā metric #1 type: 5
Ā metric #1 string_value: this is a string
Ā metric #2 name: int
Ā metric #2 type: 3
Ā metric #2 int_value: 1
Ā metric #3 name: flt
Ā metric #3 type: 1
Ā metric #3 float_value: 2.718282
Ā metric #4 name: dbl
Ā metric #4 type: 0
Ā metric #4 double_value: 0.841471
Ā metric #5 name: long
Ā metric #5 type: 2
Ā metric #5 long_value: 100000
Ā metric #6 name: bool
Ā metric #6 type: 4
Ā metric #6 bool_value: 0
Ā metric #7 name: arr
Ā metric #7 type: 6
Ā metric #7 bytes_value: 0x31 0x32 0x33
Finally, the application sleeps for several seconds to keep the connection alive and to receive any last subscribed messages that might be received, and then the cloud client session is terminated.
|
rc = edcCloudClient.stopSession(); edcCloudClient.terminate();
|
EDC test completed
This is the end of this example code.Ā See the section on Viewing Device Data to verify that the data being published from this æCÆ client is arriving in the Cloud broker.